WET CARVED CONCRETE
About Concrete Materials
For our purposes we use a standard sand mix concrete consisting of 1 part Portland Cement and 3 parts sand. Portland Cement (see below) reacts with water to harden. Keep bags of cement covered because they can take on moisture from the air and lose reactive potential. Building material suppliers occasionally have bags with corners that have gotten wet and some setting has taken place. I like to press the corners to check for this. Most places keep their cement indoors to prevent this. I usually sift each bag if it looks suspect and split it into two 5 gal. buckets with lids. This makes it easy to measure out of and also keeps it dry.
I use quarried sand, which I sift through wire window screen to remove any large objects and create consistency. Sifting the sand will ensure a mixture free of objects that may interfere with fine detail work. Nobody wants to find a katydid or cigarette butt where a nose is supposed to be as they carve. Most importantly, crushed sand is angular and in the final concrete matrix it becomes interlocked and provides superior strength. Sand that has been "water borne" is rounded and the integrity of the final product is compromised. I also have had good results with used sandblasting sand because it shatters and becomes angular during blasting. My pieces that were made from spent sandblasting sand have held up extremely well in the weather for fifteen years.
For additional strength, I use air entrainment, which puts very tiny air bubbles into the mix. This is especially helpful in areas of freeze and thaw cycles because the tiny spherical pockets vector stress in many directions. To obtain "air", as it is called, go to a Ready Mix concrete company and ask for it. Explain why you are asking because it is seldom requested and there is no other place to obtain it. If they have a valve in their delivery system tank that they can use to tap it off for you then they probably will. I've never had to pay because they don't know what to charge. Take a plastic quart milk container to put it in. You won't need too much; a gallon of concentrate lasted me over ten years with active carving.
There are two different types of "fiber mesh" that can be added to concrete in some applications for additional strength: polyethylene fiber which is fine-textured, and polypropylene fiber which is a little more coarse. For sand mix concrete the fiber strands must be teased apart by hand to mix in well. Mesh can also be obtained at a Ready Mix concrete company. I seldom use it anymore because I've found using crushed sand provides sufficient strength.
For color, there are a variety of powdered tints that can be added to the mixture. The color choices are pretty limited and the prices vary. Black, brown, buff and red are affordable, green costs quite a bit more and blue is very expensive. These hues are muted in the standard gray cement and are more vibrant when used with white a Portland Cement which is generally termed Federal Cement. They are relatively light fast though the color will fade slightly with weathering. There are a number of ways to stain concrete with the regular paint store stain or with commercial acid stains. Paint store stain doesn't look like it's worth messing with for me, but lately I have done a little experimenting with the acid stains and like the potential that they offer. However I think that some adverse effects, color wise that is, may arise from acid staining a tinted mix. Still doing my own research with this. Occasionally, I use a petroleum-based sealer for sealing bird basins to prevent them from weeping and to make them easier to keep clean. I have sealed a few planters so they will be easier to keep clean when kept indoors. Also, acrylic fortifiers are available from the building supply stores. I have not experimented with these very much either because fortifiers have not been necessary for any of my previous projects. Feedback on these products is appreciated.
Preparation
Few materials are needed for the wet carved concrete process. You will need, of course, the sand, cement, and water, as well as a hoe and trowel for mixing, a mortar box or wheelbarrow, a form for the initial shape, and some tools for carving.
Forms
The most important thing to keep in mind when constructing a form is that it must always be designed to pull away from the concrete. Never expect it to just slide off even if it has been greased or prepared with a releasing agent. There are two fundamental shapes that are generally used for forms.
A cylinder shape is made by taking a flat piece of sheet metal and wrapping it into a cylinder, clamping it at the top with a small C clamp, and tying a piece of narrow rope around it about one forth of the expected fill height from the bottom. Galvanized sheet metal used for central heat and air ductwork is strong and good for large pieces. Aluminum flashing is weak but is suitable for smaller things, especially if you wrap it around twice. For most pieces 1 foot to 2½ feet high I have found that the flat stock used to fabricate continuous gutters works very well. It is easy to cut, shape and clean and I find plenty of it cheap at scrap metal yards.
A box shape is made by screwing four pieces of plywood together. Use ¾ inch if possible. Irregular shapes can be made but remember concrete is heavy so try to anticipate how it may shift as it is filled. I have made mistakes plenty of times by failing to take this into account. Oval shaped cylinders are made by inserting your sheet metal in a rectangular box. Some people pour directly into corrugated cardboard boxes but this never really appealed to me.
I put something oily on wooden forms to keep the mix from sticking to the surface and to make it easier to release the boards. I use diesel fuel from the gas station because it is inexpensive and thin enough to penetrate the wood. Sometimes I even oil the metal forms if they have become rough. Petroleum jelly works well but is messy and more expensive. Lining the form with polyethylene is also useful at times as it is easy to pull away.
The best work surface is a piece of acrylic or Plexiglas set on a piece of plywood. It is easier to work on a smooth, hard surface when carving, and it helps when removing the piece after it is hard. Formica, oil cloth or polyethylene on a piece of plywood will work fine as well. A good turntable made with a ball bearing "Lazy Susan" is a great foundation for carving. For things you don't intend to move you can form and carve directly on the ground. This works well for large stepping stones, borders, steps, planters, etc. The "Low Wall" at my studio was all poured in place. I built each piece against the next upon an initial foundation wall constructed of broken concrete and rock. Any form that is largest at the bottom, or splayed out, will have a tendency to "ride up" as the mix is added so figure how you can fasten it down to the workspace. I try to stay away from this unless there is a real advantage.
Many times when I make planters, especially round ones, I avoid carving out the center cavity by making an inner form. With cylindrical forms, a plastic flower pot is wrapped with a piece of metal, clamped at the top, tied at the bottom and filled with wet sand. Make this form a little wider at the top and tie a small rope around the bottom of the flowerpot so you can pull it out after the sand has been removed. As you add the mix, put in the inner form and fill in around it. It is nice if your inner and outer forms are the same height; that way you can always see how much of a bottom you are leaving for your pot. Also, stabilize it because it may lean while setting, and leave yourself enough sidewall because you will be removing some of the inner and outer surfaces when carving. For small pots I have found that wet sand in empty gallon ice cream containers work, as well as smooth, tapered plastic drink tumblers smeared with petroleum jelly. Box type forms require an inner form made with plywood sides and bottom. Build this inner form with screws at the top that you can access to remove, duct tape around the bottom, and wedges placed to loosen the walls. This will take experimentation. The inner form is worth the effort on something large because it saves on how much you need to mix and remove. The cardinal rule, as always, is you must be able to pull things away from the concrete surface.
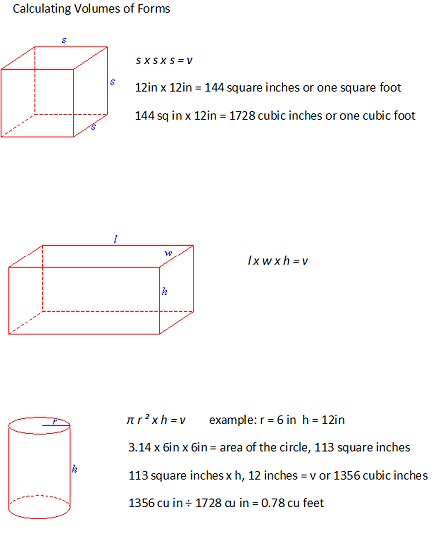
Volume
Right when many of you thought your life was settled and you would never have to use math; yikes! Don't worry it's only geometry. Depending on how involved you get with this process at some point you will need to determine how much you need to mix to fill a desired form. Although these formulas look confusing at first they are really quite simple. We do all our measurements in inches because we are not making huge things.
12 inches × 12 inches = 144 square inches or 1 square foot (Area)
144 sq. in. × 12 in. = 1728 cubic inches or 1 cubic foot (Volume)
The formula for calculating the volume of a box-shaped form is l × w × h = v. That is the length times the width times the height gives you the volume. Follow these examples:
6" × 12" × 18" = 1296 cu. in. ÷ 1728 = 0.75 or ¾ cu. ft.
18" × 12" × 18" = 3888 cu. in. ÷ 1728 = 2.25 or 2¼ cu. ft.
For an irregular size box that is say 12" high and 12" wide with one long side being 16" and the other long side being 14" take the average of 15" for your calculations. For me if the shape gets too odd I take my measurements the best I can, make my calculations, and mix a little extra. Better to mix a little more than come up short.
To figure the volume of a cylinder you use the formula: π r ² h = v. For π, or pi (22 ÷ 7) I use 3.14. Multiply that by r² or the radius of a circle multiplied by itself. This gives you the area of a circle. Multiply the circle area by the height of your cylinder and you have the volume in cubic inches. Once again you divide this number by 1728 to get cubic feet. Follow this example for a nineteen inch cylinder with a diameter of twelve inches:
3.14 × 6" × 6" = 113.04 × 19" = 2147.76 cu. in. ÷ 1728 = 1.24 or 1¼ cu. ft.
I generally figure my volumes to get a number for reference then get a little loose with my amounts and mix a bit more than my estimate. If I have a little left over I just make a small something extra. If you are doing an inner form be sure to calculate its volume to subtract from the primary amount. When calculating for an oval-shaped form get the long diameter, say 12", and the short diameter, say 8", take the average of 10", then use the radius of 5".
ONE 94 LB. BAG OF PORTLAND CEMENT MAKES 3 CU. FT. CONCRETE
Adding cement to your sand does not add much to the total volume since it fills in between the spaces of the sand when mixed. Shake or slightly drop your measurement bucket to settle the sand. This makes your measurement correspond to the settling of your wet cement as the water weeps off. Find a can or bucket to use for your proportions and calculate their volume in cubic inches. This way you will have a known volume to work with in multiples of 3 sand to 1 cement. You can even make a wood container that is 12" by 12" by 12" to really get accurate. The important thing is to stay consistent with the 3:1 ratio. If you're good at estimating the required volume you don't really need to figure anything.
If you don't want to do math
Sherri Warner Hunter offered this alternative method the first time I gave a workshop at her studio and was trying to explain all the above formulas. You can also just fill your desired form with sand, take it out, mix in the cement, then the water and put it back into the form.
Mixing
For a small batch, it is convenient to use a wheelbarrow to mix in. If you do not have a wheelbarrow, building material suppliers offer two different sizes of mortar boxes at a reasonable price, and they are also useful to put the scrapings in as you carve. If you can afford to buy a powered mixer there is a key distinction to consider. In a mortar mixer a shaft with paddles rotates inside a stationary drum. It is for sand and cement only and never for rock. A concrete mixer has the paddles bolted to the inside of the drum and the drum rotates. This is used when there is rock in the mix and the rock keeps the mix from sticking to the side of the drum. I purchased an electric, 220-volt, mortar mixer over a fifteen years ago and it still works beautifully. I chose electric because I figured any location where I might be working would always have electricity. It is also very nice to just flip the switch and not have to mess with gas or be around exhaust fumes. With any mixer it is good to keep hardened concrete chipped from the inside surface. Hard pieces may break off and get into your mix. It is also helpful to have a pointing trowel and a hoe. A mortar hoe with two holes in it is nice, but any hoe will suffice.
If you are hand mixing, and I generally do all my small mixes, 1 cu. ft. or less this way, it is important to mix the dry ingredients first; sand, cement, and tint. Sand, cement and tint are considered toxic. If you are in a poorly ventilated space it is important to wear a tight fitting particle mask when handling any of these materials and consider the affect on those in your surroundings. Pull all the dry mix to one side of the container and add the water gradually. I've never used measured amounts of water. This is one of those things you just have to work with to get the right amount. Start working the water and the mix together with the hoe until you have a pile of dry at one end and a loose slurry at the other. This is when I add the air entrainment. Place about 1 tablespoon (please don't measure this; just guess) into a plastic quart container, or something similar, and squirt water inside with a garden hose, kitchen sink sprayer or just shake it up. Recently in some of the workshop discussions we found that a squirt of dish washing soap may work just as well, but the jury is still out on that. Comments are welcome. When it is all foamed up dump it into the slurry. Mix this in, continue to gradually add water, and mix well. Be careful not to add too much water as this can weaken the concrete. The end product you want to achieve is neither too dry and crumbly nor to wet and soupy. If it gets too soupy add a little more dry mix. I've had to do this numerous times. Basically, you want a "sand pudding".
You are now ready to pour this into the form. This is when you want a trowel to scoop your concrete. As you fill your form, occasionally use the trowel or a rod of some sort to work the mix into any corners. This also works out any air pockets although small air pockets are something I've learned to live with and they generally just become surface features on the final product. Settling of the mix can also be achieved by rapping on the sides of the form with a rubber mallet, your hand or putting an orbital sander against the side of the form. It is very important not to over-settle or over-trowel the mix because this will cause the coarse sand to go to the bottom and the fine cement to rise to the top. Take your trowel and flatten the top of the filled form. A concrete float is good for large flat surfaces. As the form sits, water will bleed off from the mix. I always try to guide this into a container with old sponges or rags to keep from making a mess. I save this highly alkaline water to mix back into my scrapings, or findings, and use these leftovers on my driveway.
Temperature
Temperature is the primary factor in the setting time for concrete. Direct sunlight, wind and humidity are secondary. My experience is primarily of carving concrete in Tennessee. The southeast is a region of high humidity so the lack of air moisture may be a stronger factor in other places. There are two things to consider: the temperature of the materials and the air temperature during carving. The optimum air temperature range is 72° F to 82° F. Temperatures below or above this range either cures too slow or too fast. I have poured up the night before at 50° F and carved early the next morning. I've carved above 90° F with quick, simple pieces that I knew I could finish before it got too hard. Sometimes, on large outdoor pieces that were carved in the summer, I worked at night. During the day I would string a tarp over the work area to keep the sun from heating the surface before a night carve. I have also been caught outside in the cold and had to build a low covered space and place electric heaters inside. Working within the optimum range will give you 6 to 8 hours of working time. The initial temperature of your materials also needs to be considered. It is nice to have a 65° F night where you can start off in the morning with a cool mix and have a comfortable 6 hour working time at 80° F. If it is too hot I work inside in an air conditioned space. If your materials are kept outdoors, watch out for warm nights. This can make your initial mix set up too fast even though you may be carving in a cooled space. In the winter I pre-measure my sand and cement and bring it indoors and heat up water on the wood stove. The next day I mix outside either in the mixer or wheelbarrow. This is all brought inside to set and carve. Generally staying in this optimum range of temperature gives you about a 3-hour wait between filling the form and being able to carve.
Carving
When you can pull the form off and have the mix firmly hold its shape, it is time to begin carving.
Tools
The only power tool I use is an electric drill with an old bit for occasionally making drain holes in planters. Other than that the entire process is done by shaving, cutting, or scraping by hand. This is done with a variety of found objects and homemade tools. At yard sales old kitchen knives of various sizes are good. Any kind of round piece of metal or big spoon is good for scooping out the center of planters. Metal fabricating businesses have old, dull coarse and fine band saw blades that are generally free. An old hand saw from a yard sale is great because it has a medium tooth size. One handsaw will yield a variety of quality tools. All of these can be cut into rough shapes with a cold chisel then shaped on a bench grinder. You can also buy blades for reciprocating saws at hardware stores that have coarse and fine tooth sizes. Get blades that are big enough to hold comfortably. Many times I have jumped up during a carve and run to the grinder to shape a piece of metal for an immediate purpose. In time you will get a sense of what makes a good carving tool and the shapes you will want to fabricate for your specific design purposes.
Carving
To get a good feel for the medium, a stepping stone or a small planter, or both, is good way to start. I always put a little petroleum jelly or Castor Oil on my hands to keep the caustic wet cement from eating at my skin. Scrape down the top and sides with a coarse-toothed blade to remove the slick surfaces and expose the concrete. A knife is used to slice and shape the piece. The coarse and fine toothed blades are for roughing out and refining the piece. Flip the blade over to smooth off the tooth marks. If you are doing a stepping stone you can lightly sketch your design then proceed by defining your marks with deeper cuts. If you are doing a planter start by shaping the outside profile then scooping out the inside. Be careful not to make the walls too thin causing them to be weak. Also allow for the depth of design cuts on the outer surface. Small planters can have walls a minimum of an inch thick and large ones may have a minimum of two inch walls.
Making the initial deep cuts is easy. As the concrete gets harder so does the scraping but with this the ability to refine the surface is easier. Don't try to finish an area and leave another area untouched. Complete the rough out, then the coarse design, then the finer work, and then the finest details. When you are done, lightly sweep it with a whiskbroom or an old paintbrush. When I am working I never touch the final surface with my fingers as this can mash and smudge the surface. Invariably someone will be so amazed by your creation that they will want to touch it so watch out. Also I never squirt the piece with water as this washes the cement out of the sand and nothing is really gained from this. The finished piece is left overnight to harden. The following day it is removed from the workspace and turned over on a piece of carpet or a cushion to trim the bottom edge with a carving tool. It is then taken outside and forcefully hosed off. In wet weather I just leave it out in the rain. If it is hot and dry I will place it in a bucket of water for a few days to help it cure. Most of what you need to know about carving comes from experience and good old fashioned obvious mistakes. Most people, upon finishing their first piece declare, “Now I know what I want to make”.
The scrapings, or findings, that are produced during the process can be reused. They can not reasonably be reused with fresh cement for a strong carved piece but I have found that if you take the leftovers and spray a little water on them, remix the still crumbly, not soupy, scrapings they can be repurposed. A thick stepping stone can be made by tamping down and troweling off the mix in a form. Over an eleven year period I took the scrapings and made a "Mosaic Slab Driveway" one little piece at a time.
Portland Cement
Concrete has three primary components; Portland cement (Type I or II), aggregate, and water. Modern Portland cement was developed about 1834. It is manufactured by mixing five parts limestone and one part clay. Clay is essentially various oxides of Aluminum and Silicon and typically Al2O3 and SiO2. This is finely ground and heated to 1500°C in a large rotating kiln. This process converts the Calcium carbonate, CaCO3 to Calcium oxide, CaO or clinker, which is then finely ground. Gypsum is Calcium sulfate, CaSO4, and is added to control the setting time. When mixed with aggregate (sand, gravel) and water it sets to form strong interlacing chains of Calcium silicate, CaSiO3 and Calcium hydroxide, Ca(OH)2. The Calcium hydroxide is then slowly converted to Calcium carbonate by the action of Carbon dioxide, CO2 in the air. Concrete is best cured by keeping very wet for 14 days and it continues to strengthen for many decades. In a sense, as a combination of sandstone and limestone, concrete is reconstituted rock.
All images property of Elder G. Jones ©. Any commercial use of images beyond this site is by permission only. Copyright on the design and particular styles of all work herein is established at the stated time of creation. Individuals are free to recreate any of these pieces for personal use.